How to Create Your Own Instagram Filter
It’s finally here! I have had so many questions land in my inbox about how to create a filter and branded GIFs so I decided to pull all the information together for you guys!
Here are all the deets behind how I created my new filter “Rock the Day” filter is in this blog post. Check out Part 2: How to Create Branded GIFs on Instagram.
Instagram filter | IG filter | sparkar |sparkar community | filter effects | IG filter effects
Part 1: How to create a branded filter for use on Instagram and Facebook Stories
The website that is used to upload and maintain a filter is called Spark AR.
There are two ways you can go about creating a filter for yourself.
-
Hire someone to create your filter for you. This is the option I chose and had success hiring someone through Fiverr. She did a great job delivering what I was looking for and the price was very reasonable. Each freelancer will have different price points. Make sure you do your research reading reviews before you make a selection.
If you want to work with the freelancer I worked with you can inquire with Raquel here.
-
Create your own filter. In order to do this you will need to download the SparkAR software in order to go through the steps to create your own filter.
Download Spark AR Studio and Start Creating Effects
Once you have downloaded the software, SparkAR will walk you through a tour of the software. There are several resources on the website to create your own filter which you can find in the learn section of the website
Things to keep in mind when creating your filter:
The filter will appear differently on different types of phones (how big your phone, for example, a iPhone mini VS pro or Max) this will make a difference in how the filter can appear (for instance if you have letters/words in your filter).
You need to be very careful about how you design your filter, you can’t use your logo or symbols or any sort of text. I tried to create a filter for my funnel babes launch and it was rejected because of the dollar symbol that I included.
Once you have created your filter or you have received your filter file from the individual you hired, you will follow the following steps for upload and approval in SparkAR:
-
Make sure you are logged in your facebook account on your desktop. Once you are logged in then open a separate browser tab and go to:
https://sparkar.facebook.com/ar-studio/
-
In the upper right hand corner of the website you will click “Manage Effects” which will take you to your SparkAR Hub.
2. SparkAR Hub is where you will manage the settings and information for your filter submission.
3. Once I received the zipfile from Raquel Almeida, I was ready to upload it to the effects section of the Spark AR Hub.
SparkAR Effects Hub:
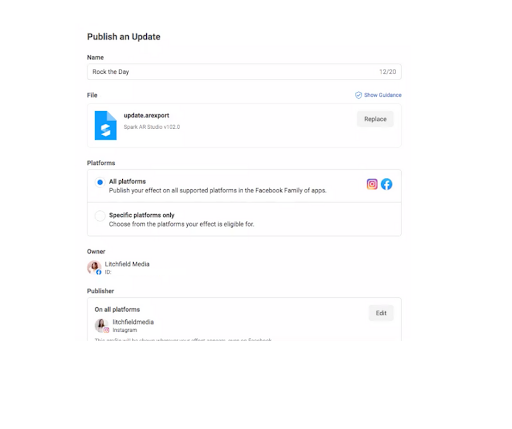
-Name your filter
-Upload the filter Zipfile
-The “Owner” will be your facebook business ads manager ID number
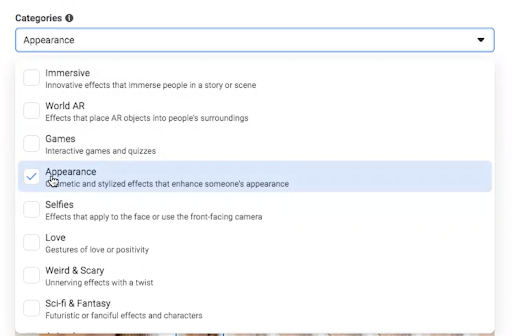
-You will need to select a category for your filter depending on the type of filter you created. I choose appearance.
-You will need to record a video preview and select a thumbnail. Note that when you do this you can ONLY use the filter. You can not have text on the video preview. Otherwise it will get denied.
Key things to understand about the Filter Preview:
You will receive a filter preview from your creator if you choose to hire someone to help create your filter. You will be able to save this to your phone and open it up through Instagram. Sometimes the preview link doesn’t work right away. I had to paste it into my notes section and then click it from there for it to pull up on Instagram.
When you click the review link it will appear in your Instagram as the Spark AR for logo when you are in preview mode. Once in preview mode viewing your filter, you will have the ability to create your Demo video to be submitted for approval.
Once you’ve recorded your demo video you will upload it to the demo section and then pick a thumbnail to act as your “video cover photo”.
When your filter is approved, a new section will appear on your Instagram page. This new section will be your filter section. The thumb nail you selected in the demo section in SparkAR is what will appear in this section of your Instagram page.
Keywords: Choose keywords related to your filter
Filter icon: Your filter icon can not have any logos or text on it. It’s best to just put an image of something. I’ve seen people use pictures of themselves as their filter icon.
Publish date: You can choose to have it published as soon as possible or you can schedule the filter to publish on a specific date and time.
Instructions for reviewer: Explain what your effect does and how to use it. This is to guide the user as to how they will be using your filter. As an example you can tap the screen for my filter and each time you tap the screen it changes the configuration of the day of the week and time.
Once you’ve completed these steps you can click submit or you can also test the filter again, a link will be produced for you to test the filter on your Instagram account.
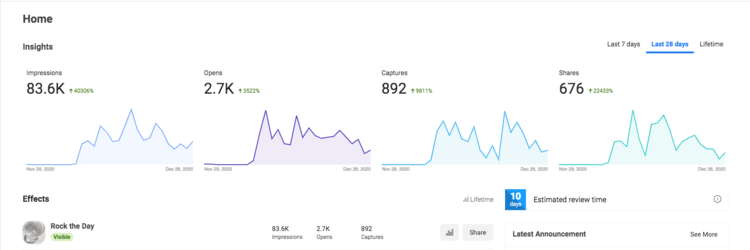
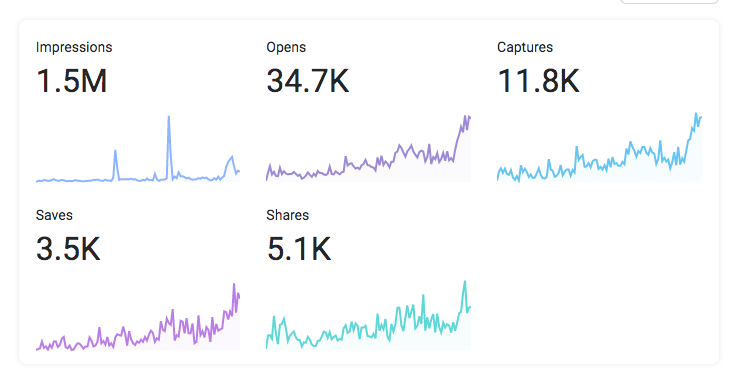
Within the Spark AR Hub you will be able to review your insights as your filter is live and begins to be used by your community or individuals that see your filter and decide to use it.
In less than 3 weeks time here are the insights on my Rock the Day Filter:
In 4 months time we are 1.5 Million Impressions on my Rock the Day Filter:
Filter’s have the opportunity to have a long lasting impression far longer than any other posting options on Instagram right now! If you found this helpful please share and pin to Pinterest. Also, tag me on stories if you end up publishing your own filter!
Resources:
SparkAR Learning: https://sparkar.facebook.com/ar-studio/learn/
Form to inquire about your own filter creation: https://forms.gle/sTc9kGGX42pJfWT99
Spark AR Community of Facebook: https://www.facebook.com/groups/sparkarcommunity
Melissa from Litchfield Media writes about all the tips and tricks to run successful and profitable ads for your online business.
